четверг, 4 декабря 2025 г.

суббота, 26 августа 2023 г.
Disable Edge Browser Initial Questions
cls
# Parameters
$registryPath = "HKLM:\SOFTWARE\Policies\Microsoft\Edge"
$registryName = "HideFirstRunExperience"
$registryValue = 1
# Function to disable Edge initial questions
function Disable-EdgeFirstRunExperience {
# Check if the registry key exists
if (-Not (Test-Path $registryPath)) {
# Create the registry key if it doesn't exist
New-Item -Path $registryPath -Force
}
# Set the registry value to disable the first-run experience
Set-ItemProperty -Path $registryPath -Name $registryName -Value $registryValue
}
# GUI Design
Add-Type -AssemblyName System.Windows.Forms
$form = New-Object System.Windows.Forms.Form
$form.Text = "Disable Edge Initial Questions"
$form.Size = New-Object System.Drawing.Size(300,150)
$form.StartPosition = "CenterScreen"
$button = New-Object System.Windows.Forms.Button
$button.Location = New-Object System.Drawing.Point(75,40)
$button.Size = New-Object System.Drawing.Size(150,30)
$button.Text = "Disable Questions"
$button.Add_Click({
Disable-EdgeFirstRunExperience
[System.Windows.Forms.MessageBox]::Show("Edge initial questions have been disabled.", "Success")
})
$form.Controls.Add($button)
$form.ShowDialog()
Set new WINS in Windows with PoSH GUI script
It is a good GUI script which checks if the new WINS IP is the same as the previous, and checks if the IP is kosher. You can't use 1.2.3.4.5.6 or 900.900.900.900 or 10.10, for example.

cls
# Load necessary assemblies for GUI
Add-Type -AssemblyName System.Windows.Forms
# Function to get current WINS IP
Function GetCurrentWINS {
$currentWinsInfo = netsh interface ip show config "Ethernet" | Select-String "WINS"
$currentWinsIP = if ($currentWinsInfo) { ($currentWinsInfo -split ":")[1].Trim() } else { "Not Set" }
return $currentWinsIP
}
# Function to validate IP address
Function Validate-IPAddress {
param (
[string]$IPAddress
)
return ([System.Net.IPAddress]::TryParse($IPAddress, [ref]0))
}
# Initial Old WINS IP
$oldWINS = GetCurrentWINS
# Create the main form
$form = New-Object System.Windows.Forms.Form
$form.Text = "Set WINS IP Address"
$form.Size = New-Object System.Drawing.Size(400, 250)
$form.StartPosition = "CenterScreen"
$form.BackColor = [System.Drawing.Color]::LightBlue
# Create a GroupBox for Old WINS IP
$groupOld = New-Object System.Windows.Forms.GroupBox
$groupOld.Text = "Old WINS IP for adapter `Ethernet`:"
$groupOld.Location = New-Object System.Drawing.Point(10, 10)
$groupOld.Size = New-Object System.Drawing.Size(370, 50)
$form.Controls.Add($groupOld)
# Create a label for Old WINS IP address
$labelOldWINS = New-Object System.Windows.Forms.Label
$labelOldWINS.Text = $oldWINS
$labelOldWINS.AutoSize = $true
$labelOldWINS.Location = New-Object System.Drawing.Point(10, 20)
$groupOld.Controls.Add($labelOldWINS)
# Create a text box for WINS IP address input
$textBoxWINS = New-Object System.Windows.Forms.TextBox
$textBoxWINS.Location = New-Object System.Drawing.Point(10, 70)
$textBoxWINS.Size = New-Object System.Drawing.Size(260, 20)
$textBoxWINS.Text = GetCurrentWINS
$textBoxWINS.Add_KeyDown({
if ($_.KeyCode -eq 'Enter') {
$buttonSet.PerformClick()
}
})
$form.Controls.Add($textBoxWINS)
# Create a GroupBox for New WINS IP
$groupNew = New-Object System.Windows.Forms.GroupBox
$groupNew.Text = "New WINS IP for adapter `Ethernet`:"
$groupNew.Location = New-Object System.Drawing.Point(10, 100)
$groupNew.Size = New-Object System.Drawing.Size(370, 50)
$form.Controls.Add($groupNew)
# Create a label for displaying the new WINS IP
$labelNewWINS = New-Object System.Windows.Forms.Label
$labelNewWINS.AutoSize = $true
$labelNewWINS.Location = New-Object System.Drawing.Point(10, 20)
$groupNew.Controls.Add($labelNewWINS)
# Create a button to set the WINS IP address
$buttonSet = New-Object System.Windows.Forms.Button
$buttonSet.Text = "Set WINS IP"
$buttonSet.Location = New-Object System.Drawing.Point(280, 70)
$buttonSet.Add_Click({
$newWINS = $textBoxWINS.Text
if (Validate-IPAddress $newWINS) {
if ($newWINS -eq $oldWINS) {
$labelNewWINS.Text = "IP is the same as Old WINS. No changes made."
} else {
netsh interface ip set wins "Ethernet" static $newWINS
$labelNewWINS.Text = $newWINS
$oldWINS = $newWINS
}
} else {
$labelNewWINS.Text = "Invalid IP address. No changes made."
}
})
$form.Controls.Add($buttonSet)
# Create an Exit button
$buttonExit = New-Object System.Windows.Forms.Button
$buttonExit.Text = "Exit"
$buttonExit.Location = New-Object System.Drawing.Point(280, 160)
$buttonExit.Add_Click({
$form.Close()
})
$form.Controls.Add($buttonExit)
# Show the form
$form.ShowDialog()
суббота, 22 июля 2023 г.
Enable Shared PC with registry
We need to check if this script really enables Shared PC mode.
It works with registry, but there is also a way to work with Cim/WMI.
In the next few days I will check what is better.
###START###
cls
Add-Type -AssemblyName System.Windows.Forms
# Set form size and positioning variables
$mainFormWidth = 365
$mainFormHeight = 210
$margin = 20
$verticalSpacing = 30
$marksRightShift = 55
$boxSpacing = 20
$checkBoxSize = 20
$numericUpDownWidth = 70
$numericUpDownHeight = 20
$formFont = 'Microsoft Sans Serif, 10'
# Calculate positions
$label_X = $margin
$checkBox_X = $mainFormWidth / 2 + $boxSpacing
$numericUpDown_X = $mainFormWidth / 2 + $boxSpacing
$okButton_X = ($mainFormWidth - $numericUpDownWidth) / 2 - 80
$cancelButton_X = ($mainFormWidth + $numericUpDownWidth) / 2 -30
$button_Y = $mainFormHeight - $margin - $numericUpDownHeight - $verticalSpacing
# Create the main form
$mainForm = New-Object System.Windows.Forms.Form
$mainForm.Text = 'SharedPC Mode Configuration'
$mainForm.Size = New-Object System.Drawing.Size($mainFormWidth, $mainFormHeight)
$mainForm.StartPosition = 'CenterScreen'
$mainForm.Font = $formFont
# Create a label and checkbox for enabling SharedPC Mode
$enableSharedPCLabel = New-Object System.Windows.Forms.Label
$enableSharedPCLabel.Text = 'Enable SharedPC Mode:'
$enableSharedPCLabel.AutoSize = $True
$enableSharedPCLabel.Location = [System.Drawing.Point]::new($label_X, $margin)
$enableSharedPCCheckBox = New-Object System.Windows.Forms.CheckBox
$enableSharedPCCheckBox.Location = [System.Drawing.Point]::new($checkBox_X + $marksRightShift, $margin)
$enableSharedPCCheckBox.Size = New-Object System.Drawing.Size($checkBoxSize, $checkBoxSize)
$mainForm.Controls.Add($enableSharedPCLabel)
$mainForm.Controls.Add($enableSharedPCCheckBox)
# Create a label and numeric updown box for setting maintenance start time
$maintenanceLabel = New-Object System.Windows.Forms.Label
$maintenanceLabel.Text = 'Maintenance Start Time (0-23 hours):'
$maintenanceLabel.AutoSize = $True
$maintenanceLabel.Location = [System.Drawing.Point]::new($label_X, $margin + $verticalSpacing)
$maintenanceNumericUpDown = New-Object System.Windows.Forms.NumericUpDown
$maintenanceNumericUpDown.Location = [System.Drawing.Point]::new($numericUpDown_X + $marksRightShift, $margin + $verticalSpacing)
$maintenanceNumericUpDown.Size = New-Object System.Drawing.Size($numericUpDownWidth, $numericUpDownHeight)
$maintenanceNumericUpDown.Minimum = 0
$maintenanceNumericUpDown.Maximum = 23
$mainForm.Controls.Add($maintenanceLabel)
$mainForm.Controls.Add($maintenanceNumericUpDown)
# Create a label to display the result (SharedPC Mode enabled/disabled or AutoConfigURL value)
$resultLabel = New-Object System.Windows.Forms.Label
$resultLabel.Text = "Result will be displayed here..."
$resultLabel.AutoSize = $False
$resultLabel.Width = $mainFormWidth - $margin * 2
$resultLabel.Height = 60
$resultLabel.Location = [System.Drawing.Point]::new($margin, $margin + $verticalSpacing * 2)
$mainForm.Controls.Add($resultLabel)
# Create an Execute button
$executeButton = New-Object System.Windows.Forms.Button
$executeButton.Text = 'Execute'
$executeButton.Location = [System.Drawing.Point]::new($okButton_X, $button_Y)
$executeButtonWidth = $numericUpDownWidth + 20
$executeButtonHeight = $numericUpDownHeight + 5
$executeButton.Size = New-Object System.Drawing.Size($executeButtonWidth, $executeButtonHeight)
# Create a bold font and assign it to the Execute button
$boldFont = New-Object System.Drawing.Font("Microsoft Sans Serif", 10, [System.Drawing.FontStyle]::Bold)
$executeButton.Font = $boldFont
$mainForm.Controls.Add($executeButton)
# Create a Cancel button
$cancelButton = New-Object System.Windows.Forms.Button
$cancelButton.Text = 'Cancel'
$cancelButton.Location = [System.Drawing.Point]::new($cancelButton_X, $button_Y)
$cancelButton.Size = New-Object System.Drawing.Size($executeButtonWidth, $executeButtonHeight)
$cancelButton.Font = $boldFont
# Add an event handler to close the form when Cancel is clicked
$cancelButton.Add_Click({
$mainForm.Close()
})
$mainForm.Controls.Add($cancelButton)
# Incorporate the provided short code to check SharedPC mode status
$wmiObj = Get-WmiObject -Namespace "root\cimv2\mdm\dmmap" -Class "MDM_SharedPC"
$sharedPCStatus = $wmiObj.EnableSharedPCMode
if ($sharedPCStatus) {
$enableSharedPCCheckBox.Checked = $true
$resultLabel.Text = "SharedPC Mode is currently enabled."
} else {
$enableSharedPCCheckBox.Checked = $false
$resultLabel.Text = "SharedPC Mode is currently disabled."
}
# Add an event handler for the Execute button click
$executeButton.Add_Click({
# Check if the SharedPC status matches the checkbox state
if ($enableSharedPCCheckBox.Checked -eq $sharedPCStatus) {
$resultLabel.Text = "SharedPC Mode is already in the selected state."
return
}
# Disable buttons during execution
$executeButton.Enabled = $false
$cancelButton.Enabled = $false
$okButton.Enabled = $false
# This is where you can use the user's inputs in your script
$isSharedPCModeEnabled = $enableSharedPCCheckBox.Checked
$maintenanceStartTime = $maintenanceNumericUpDown.Value
# Enable or Disable SharedPC Mode based on the checkbox state
if ($isSharedPCModeEnabled) {
Set-ItemProperty -Path 'HKCU:\Software\Microsoft\Windows\CurrentVersion\CloudStore\Store\Cache\DefaultAccount' -Name "DefaultStoreAccountStatus" -Value 1
$resultLabel.Text = "SharedPC Mode has been enabled."
} else {
Set-ItemProperty -Path 'HKCU:\Software\Microsoft\Windows\CurrentVersion\CloudStore\Store\Cache\DefaultAccount' -Name "DefaultStoreAccountStatus" -Value 0
$resultLabel.Text = "SharedPC Mode has been disabled."
}
# Get the updated SharedPC status
$sharedPCStatus = $wmiObj.EnableSharedPCMode
# Enable buttons after execution is completed
$executeButton.Enabled = $true
$executeButton.Text = 'Execute'
$cancelButton.Enabled = $true
$okButton.Enabled = $true
})
# Create an OK button
$okButton = New-Object System.Windows.Forms.Button
$okButton.Text = 'OK'
$okButton.Location = [System.Drawing.Point]::new($cancelButton_X, $button_Y)
$okButton.Size = New-Object System.Drawing.Size($executeButtonWidth, $executeButtonHeight)
$okButton.Font = $boldFont
$okButton.Enabled = $false
# Add an event handler to close the form when OK is clicked
$okButton.Add_Click({
$mainForm.Close()
})
$mainForm.Add_FormClosed({
# Close the form if the user closes it using the window close button (X)
$mainForm.Close()
})
$mainForm.Controls.Add($okButton)
# Show the form
$mainForm.ShowDialog()
###END###
Delete local users if not current and not Admin
# Get the username of the currently logged in user
$current_username = [Environment]::UserName
# Get all local users
$local_users = Get-WmiObject -Class Win32_UserAccount -Filter "LocalAccount='True'" | Where-Object { $_.SID -notlike "S-1-5-21-*" }
# Iterate over the local users
foreach ($user in $local_users) {
# If the user is not the currently logged in user
if ($user.Name -ne $current_username) {
# Delete the user
net user $user. Name /delete
}
}
Delete LocalAdmin users for SharedPC
cls
# Get all local users named "LocalAdmin"
$local_users = Get-WmiObject -Class Win32_UserAccount -Filter "LocalAccount='True'" | Where-Object { $_.Name -like "LocalAdm*" }
# Iterate over the local users
foreach ($user in $local_users) {
$user.Name
# Delete the user if its name starts with "LocalAdmin"
net user $user. Name /delete
}
Create LocalAdmin for Shared PC
cls
Add-Type -AssemblyName System.Windows.Forms
$form = New-Object System.Windows.Forms.Form
$form.Text = 'New Admin User'
$form.Size = New-Object System.Drawing.Size(400,250) # Reduced form size
$form.StartPosition = "CenterScreen"
# Status label
$statusLabel = New-Object System.Windows.Forms.Label
$statusLabel.Location = New-Object System.Drawing.Point(10,10)
$statusLabel.Size = New-Object System.Drawing.Size(360,150) # Reduced the height here
$statusLabel.Font = New-Object System.Drawing.Font("Arial",12,[System.Drawing.FontStyle]::Bold)
$statusLabel.ForeColor = [System.Drawing.Color]::DarkBlue
$statusLabel.Text = ""
$form.Controls.Add($statusLabel)
# add button
$button = New-Object System.Windows.Forms.Button
$button.Size = New-Object System.Drawing.Size(120,40)
$button.Font = New-Object System.Drawing.Font("Arial",12)
$button.Text = 'Add User'
$button.Location = New-Object System.Drawing.Point([int](($form.ClientSize.Width - $button.Width) / 2), [int]($form.ClientSize.Height - $button.Height - 10)) # Change the margin here
$button.Add_Click({
$adminName = "LocalAdmin"
$adminPass = 'Password123'
#$adminPass = 'Pa$$word123'
$suffix = ""
while (Get-WmiObject Win32_UserAccount -filter "Name='$adminName$suffix'" -ErrorAction SilentlyContinue) {
if ($suffix -eq "") {
$suffix = 1
} else {
$suffix++
}
}
$adminName += $suffix
invoke-expression "net user /add $adminName $adminPass"
$user = New-Object System.Security.Principal.NTAccount($adminName)
$sid = $user.Translate([System.Security.Principal.SecurityIdentifier])
$sid = $sid.Value;
New-Item -Path "HKLM:\Software\Microsoft\Windows\CurrentVersion\SharedPC\Exemptions\$sid" -Force
$statusLabel.Text = "User $adminName`nhas been created."
})
$form.Add_Resize({
$button.Top = $form.ClientSize.Height - $button.Height - 10 # Change the margin here
$button.Left = ($form.ClientSize.Width - $button.Width) / 2
})
$form.Controls.Add($button)
# Check user on form load
$adminName = "LocalAdmin"
if (Get-WmiObject Win32_UserAccount -filter "Name='$adminName'" -ErrorAction SilentlyContinue) {
$statusLabel.Text = "User $adminName already exists. `nRecommended not to create."
} else {
$statusLabel.Text = "User $adminName does not exist."
}
$form.ShowDialog()
GUI to set Proxy in Windows
Adjust the Proxy URL as needed.
### START ###
cls
# Set Proxy
# Define properties
$fontName = "Arial"
$fontSize = 10
$formWidth = 450
$formHeight = 350
$labelWidth = 570
$labelHeight = 20
$formText = 'Set Proxy AutoConfigURL'
$currentLabelLocation = New-Object System.Drawing.Point(10,20)
$textBoxLocation = New-Object System.Drawing.Point(10,45)
$futureLabelLocation = New-Object System.Drawing.Point(10,70)
$setButtonLocation = New-Object System.Drawing.Point(40,100)
$cancelButtonLocation = New-Object System.Drawing.Point(130,100)
$removeButtonLocation = New-Object System.Drawing.Point(220,100)
$buttonSize = New-Object System.Drawing.Size(75,23)
$autoConfigURL = 'http://pac.domain:8080/pac.pac'
$currentAutoConfigURL = 'Not set'
$registryPath = 'HKCU:\Software\Microsoft\Windows\CurrentVersion\Internet Settings'
# Load necessary assemblies
Add-Type -AssemblyName System.Windows.Forms
# Create the form
$form = New-Object System.Windows.Forms.Form
$form.Text = $formText
$form.Size = New-Object System.Drawing.Size($formWidth,$formHeight)
$form.StartPosition = 'CenterScreen'
# Define the font
$font = New-Object System.Drawing.Font($fontName, $fontSize)
# Get the current AutoConfigURL value, if it exists
try {
$currentAutoConfigURL = (Get-ItemProperty -Path $registryPath -Name AutoConfigURL -ErrorAction Stop).AutoConfigURL
} catch {
# The AutoConfigURL property does not exist
}
# Create label for current AutoConfigURL
$currentLabel = New-Object System.Windows.Forms.Label
$currentLabel.Location = $currentLabelLocation
$currentLabel.Size = New-Object System.Drawing.Size($labelWidth,$labelHeight)
$currentLabel.Text = 'Current AutoConfigURL: ' + $currentAutoConfigURL
$currentLabel.Font = $font
$form.Controls.Add($currentLabel)
# Create TextBox for input
$inputTextBox = New-Object System.Windows.Forms.TextBox
$inputTextBox.Location = $textBoxLocation
$inputTextBox.Size = New-Object System.Drawing.Size($labelWidth,$labelHeight)
$inputTextBox.Text = $autoConfigURL
$form.Controls.Add($inputTextBox)
# Create Set button
$setButton = New-Object System.Windows.Forms.Button
$setButton.Location = $setButtonLocation
$setButton.Size = $buttonSize
$setButton.Text = 'Set'
$setButton.DialogResult = [System.Windows.Forms.DialogResult]::OK
$form.AcceptButton = $setButton
$form.Controls.Add($setButton)
# Create cancel button
$cancelButton = New-Object System.Windows.Forms.Button
$cancelButton.Location = $cancelButtonLocation
$cancelButton.Size = $buttonSize
$cancelButton.Text = 'Cancel'
$cancelButton.DialogResult = [System.Windows.Forms.DialogResult]::Cancel
$form.CancelButton = $cancelButton
$form.Controls.Add($cancelButton)
# Create remove button
$removeButton = New-Object System.Windows.Forms.Button
$removeButton.Location = $removeButtonLocation
$removeButton.Size = $buttonSize
$removeButton.Text = 'Remove'
$removeButton.Add_Click({
# Set the AutoConfigURL to an empty string
Set-ItemProperty -Path $registryPath -Name AutoConfigURL -Value ''
# Disable proxy use in Internet Explorer settings
Set-ItemProperty -Path $registryPath -Name ProxyEnable -Value 0
$form.Close()
})
$form.Controls.Add($removeButton)
# Create a group box
$groupBox = New-Object System.Windows.Forms.GroupBox
$groupBox.Location = New-Object System.Drawing.Point(10,150)
$groupBox.Size = New-Object System.Drawing.Size(410,105) # Adjust the size as necessary
$groupBox.Text = 'Instructions'
$groupBox.Font = $font
$form.Controls.Add($groupBox)
# Create instructions
$instructions = @(
'1. Enter the new AutoConfigURL in the text box.',
'Click Set to set the new AutoConfigURL and enable the proxy.',
'2. Click Remove to clear the AutoConfigURL and disable proxy.',
'3. Clear the textbox and click Set to disable the proxy.'
)
$labelLocation = 20
foreach ($instruction in $instructions) {
$instructionLabel = New-Object System.Windows.Forms.Label
$instructionLabel.Location = New-Object System.Drawing.Point(10,$labelLocation)
$instructionLabel.Size = New-Object System.Drawing.Size(410,20) # Adjust the size as necessary
$instructionLabel.Text = $instruction
$instructionLabel.Font = $font
$groupBox.Controls.Add($instructionLabel)
$labelLocation += 20 # Adjust the spacing as necessary
}
# Show the form
$form.Topmost = $true
$result = $form.ShowDialog()
# If user clicks Set, set the AutoConfigURL
if ($result -eq [System.Windows.Forms.DialogResult]::OK) {
Set-ItemProperty -Path $registryPath -Name AutoConfigURL -Value $inputTextBox.Text
Set-ItemProperty -Path $registryPath -Name ProxyEnable -Value 1
}
### END ###
суббота, 8 июля 2023 г.
**Docker-Commands**
- Image Creation with Dockerfile:
docker image build.
- Image Tagging and Versioning:
docker image tag.
- Image Distribution:
docker image push.
- Image Sharing:
docker login,
docker tag,
docker push.
- Image Pulling:
docker image pull.
- Running Containers:
docker container run.
- Containers Management:
docker container ls,
docker container start,
docker container stop,
docker container rm.
- Containers Show:
Show all running containers: docker ps. - Show all containers (running or stopped): docker
ps -a.
- Show the logs of a container: docker
logs <container_name>.
- Show the details of a container: docker
inspect <container_name>.
- Show the disk usage of Docker objects: docker
system df.
- Image Updates and Maintenance:
docker image pull,
docker image build,
docker image push.
- Rollbacks and Version Control:
docker image history,
docker image tag.
docker image rm.
Cisco switch - add a port to VLAN
## Add port Gi4/0/50 to VLAN 333
enable
conf t
int gi4/0/50
no switchport access vlan 444
switchport access vlan 333
exit
exit
show run
copy run start
## Remove port Gi4/0/50 from VLAN
conf t
int gi4/0/50
no switchport access vlan 333
##Remove VLAN##
conf t
no vlan 333
## Save configuration
copy run start
Comparing Terminal Emulators
I have created this table with the assistance of ChatGPT and Bard.
My primary concern is to include all three connection options: SSH, RDP, and Web. However, none of the five completely free options can connect using all three options simultaneously.
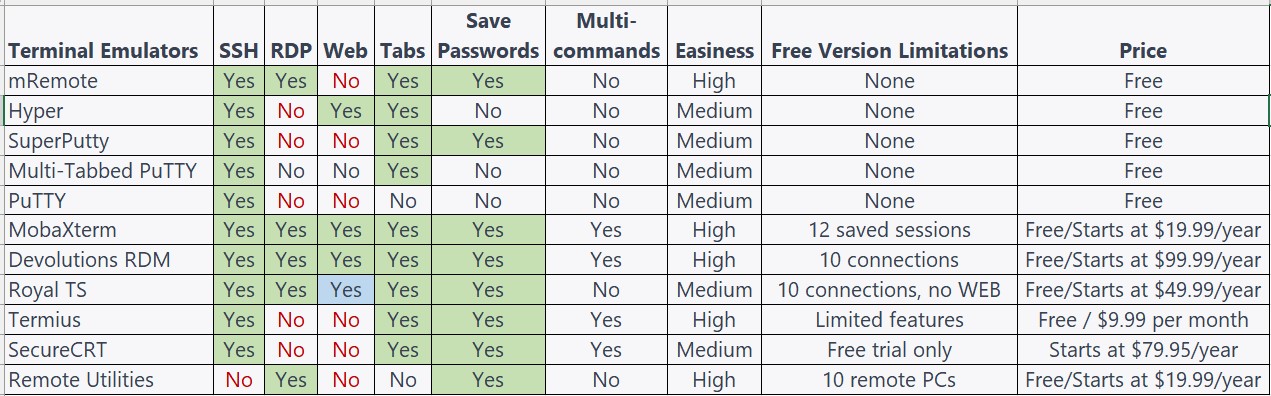
If you require SSH and RDP connectivity, mRemote could be considered the best choice. For Web access, Hyper is a viable option as it offers both SSH and Web connectivity.
If you only need SSH access, SuperPutty is a viable choice, especially considering its password memory feature, which is not available in its closest competitor, MTPutty.
For a comprehensive set of access options, MobaXterm or Devolution RDM can be considered. Both provide SSH, RDP, and Web connectivity even in their free versions. However, they do have limitations on the number of sessions or connections allowed. MobaXterm permits up to 12 connections, while Devolution RDM allows up to 10.
RoyalTS also offers all three connection options, but Web access is only available in the paid version. Hence, if you prefer a free option, mRemote is comparable to RoyalTS in terms of features, and mRemote does not have any limitations on the number of connections.
In summary, the two winners among the free options are MobaXterm and Devolution RDM, considering their limitations on the number of connections.
Here are some additional details about each program:
- mRemote: mRemote is a free and open-source remote desktop connection manager that supports a wide range of protocols, including SSH, RDP, VNC, and Telnet. It has a simple interface and is easy to use.
- Hyper: Hyper is a free and open-source terminal emulator that supports a wide range of protocols, including SSH, RDP, and Websockets. It has a modern interface and supports a wider range of features than mRemote, such as tabs, split panes, and macros.
- SuperPutty: SuperPutty is a free and open-source SSH client that supports a wide range of features, such as saved sessions, password management, and tunneling. It is a good option if you only need SSH access.
- MobaXterm: MobaXterm is a freemium remote desktop connection manager that supports a wide range of protocols, including SSH, RDP, VNC, and Telnet. It has a powerful feature set and is a good option for users who need more than the basic features offered by mRemote or Hyper.
- Devolution RDM: Devolution RDM is a freemium remote desktop connection manager that supports a wide range of protocols, including SSH, RDP, VNC, and Telnet. It has a similar feature set to MobaXterm, but it is a bit less powerful.
- RoyalTS: RoyalTS is a paid remote desktop connection manager that supports a wide range of protocols, including SSH, RDP, VNC, and Telnet. It has a powerful feature set and is a good option for users who need more than the basic features offered by the free options.
пятница, 30 июня 2023 г.
**Identifying Computer's Disk and RAM Memory: A Comprehensive Guide**
**Introduction:**
Understanding your computer's hardware specifics, such as RAM and disk drive details, is essential for efficient system upgrades, maintenance, and troubleshooting. This need became particularly apparent to me when I recently acquired a new Intel NUC 12 Enthusiast Kit computer. I transferred my old 1TB Crucial disk to the new system and set out to document its specifications, but I quickly encountered challenges identifying some components.
Here are the specifications of my new Intel NUC 12 Enthusiast Kit computer:
OS: Windows 11 Education 64-bit
Motherboard Model: NUC12SNKi72 (U3E1)
CPU: 12th Gen Intel Core i7-12700H
Memory Size: 64 MBytes - KINGSTON
Hard Drives:
KINGSTON SKC3000D2048G (SSD/NVMe) 2TB
Crucial CT1000MX500SSD4 (SSD) SATA-III 6.0Gb/s
Graphics: AW2521HFA on Intel Arc A770M Graphics + Iris Xe Graphics
The Windows Management Instrumentation Command-line (WMIC) and third-party tools offer convenient methods to fetch this kind of information. However, I found that their efficacy varied, and each tool had its own strengths and limitations. This article delves into my experiences and findings.
**Identifying RAM and Disk Drives with WMIC:**
WMIC commands are a quick and direct way to gather hardware information:
- wmic memorychip get devicelocator, manufacturer
offers details about your RAM modules, including the slot in which each memory chip is installed and the manufacturer.

- wmic diskdrive get model, serialNumber, size, mediaType
provides the model number, serial number, size, and media type of your disk drives.

Though generally reliable, WMIC may struggle with certain SSD models, like Crucial, leading to misrepresented serial numbers.
**Analyzing Third-Party Tools:**
Third-party tools can complement WMIC commands to provide a fuller picture. The following table summarizes their performance:

The tools are sorted by their overall effectiveness in identifying the three main parameters. WMIC commands, HWiNFO64, and Speccy tied in first place with 2 out of 3. Here's a deeper dive into each tool:
- **WMIC**: Reliable for identifying RAM manufacturers and Kingston disk drives, but struggles with Crucial disk serial numbers.
- **HWiNFO64**: Accurately identifies RAM manufacturers and Kingston NVMe SSDs, but falls short with Crucial SSDs.
- **Speccy**: Exceptionally good at identifying disk drives, including Crucial models, but it doesn't identify RAM manufacturers.
- **CPUID HWMonitor**: Identifies many disk drives, including those from Kingston, but struggles with Crucial SSDs and memory manufacturers.
- **CPU-Z**: While it doesn't identify either memory manufacturers or disk drives, CPU-Z shines in providing detailed information about the system's main devices, especially the CPU.
**Conclusion:**
Determining the specifics of your computer's RAM and disk memory might present certain complexities, given the wide array of hardware and the variable effectiveness of different identification tools. However, by gaining a solid understanding of your hardware specifications, you can enhance your decision-making process concerning system upgrades, maintenance, and troubleshooting.
To help you navigate this process, the table provided offers a quick reference guide to select the tool that best suits your needs. If a comprehensive and GUI-based overview is your preference, a combination of HWiNFO64 for RAM identification, Speccy for disk drive detection, and CPU-Z for CPU information can provide a well-rounded picture of your system's components.
Exploring beyond the tools mentioned in this article can open the doors to a multitude of third-party utilities, each boasting its unique features for identifying your computer's hardware. A little research can lead you to the tools that best align with your needs and budget.
Armed with the right tools and knowledge, the task of identifying the RAM and disk memory in your computer becomes straightforward. This newfound information can serve as the linchpin for maintaining your machine's performance and efficiency.
If uncertainty about the choice of tool persists, initiating your journey with WMIC commands is a recommended step. They provide a swift and simple method for gaining basic information about your hardware. For a more in-depth understanding, consider using one of the third-party tools highlighted in this article. However, if identification challenges remain, your computer's manual or manufacturer support can serve as an invaluable resource.
This understanding of your system's specifics can streamline your troubleshooting efforts, optimize performance, and guide your future hardware decisions. So, continue to explore, learn and harness the full potential of your machine.
четверг, 8 июня 2023 г.
Dynamic menu script to run other scripts
# Get scripts in a folder, create a GUI menu and run the chosen script
# "Path_To_Scripts_Directory\" - it's not where this launching script is located, it's where the bunch of scripts you want to create the menu from is.
$PathToScripts = "Path_To_Scripts_Directory\"
$FilesInPath = $PathToScripts+"*"
# get a list of scripts/files
$Scripts = Get-ChildItem -File $FilesInPath | sort Name
# choosing the script for run
$SelectedScript = $Scripts.Name | OGV -Title "Menu" -PassThru
$FullPathToScript = $PathToScripts+$SelectedScript
# launching selected script
& $FullPathToScript
vCloud - Export Template to OVF
#ScriptDescription : =Export from Template to OVF=
cls
Write-Host "Export from vCloud Template to OVF with help of vCenter" -BackgroundColor DarkRed -foreground Yellow
Write-Host "(Check lease and renew if needed)" -BackgroundColor Black
$TemplateName = ""
$DestVAppName = ""
$SubStringLength = "10"
Import-Module VMware.PowerCLI | Out-Null
# Import-Module VMware.PowerCLI 3>$null
Set-PowerCLIConfiguration -InvalidCertificateAction Ignore -confirm:$false | Out-Null
$ErrorActionPreference = 'SilentlyContinue'
$WarningActionPreference = 'SilentlyContinue'
$ErrorPreference = 'SilentlyContinue'
$WarningPreference = 'SilentlyContinue'
##== Defining general parameters ==##
[Reflection.Assembly]::LoadWithPartialName('Microsoft.VisualBasic') > $NULL
$TemplateName = [Microsoft.VisualBasic.Interaction]::InputBox("Put Template name `n(otherwise the script will exit...)", "Template Name")
IF(-not$TemplateName){Write-Host "You did not provide Template name, the script is exiting..." -BackgroundColor Black; Break}
if ($TemplateName.Length -gt $SubStringLength)
# {$ShortTemplateName = $TemplateName.SubString(0,25); $DestVAppName = $ShortTemplateName+"(OVF)"}
{$DestVAppName = ($TemplateName.SubString(0,$SubStringLength))+"(OVF)"}
else{$DestVAppName = $TemplateName+"(OVF)"}
Write-Host "Destination VApp name is '$DestVAppName'" -BackgroundColor Green
$UpperFolder = "D:\OVF"
$DestFolder = -join($UpperFolder+"\"+$DestVAppName+"\")
MD $DestFolder
$TestPath = Test-Path -Path $DestFolder
If($TestPath){Write-Host "Path '$DestFolder' exists!" -BackgroundColor Red} Else{ "Path isn't created. The script will exit..."; Break }
##== Defining vCloud/vCenter connection parameters ==##
$vCloud = 'vCloud'
$vCenter = 'VCRD'
$UserName = $env:UserName
$SecurePass = Read-Host -AsSecureString "Please enter password for $UserName and wait..."
$ClearPass = [System.Runtime.InteropServices.Marshal]::PtrToStringAuto([System.Runtime.InteropServices.Marshal]::SecureStringToBSTR($SecurePass))
##== Connecting to vCenter/vCloud ==##
Write-Host
Write-Host "Connecting to vCenter/vCloud" -BackgroundColor DarkRed
Disconnect-VIServer * -Confirm:$false -ErrorAction SilentlyContinue
Connect-VIServer -Server $vCenter -User $UserName -Password $ClearPass -ErrorAction SilentlyContinue | Out-Null
Write-Host You are connected to vCenter -BackgroundColor Green
Disconnect-CIServer * -Confirm:$false | Out-Null
Connect-CIServer -Server $vCloud -User $UserName -Password $ClearPass -ErrorAction SilentlyContinue | Out-Null
Write-Host "You are connected to vCloud" -BackgroundColor Green
$global:DefaultVIServers | select Name, User, Version
$global:DefaultCIServers | select Name, User, Version, Org
##== Real Work - Converting Template to vApp ==##
##==Checking Template existence
$VAppTemplateOBJ = Get-CIVAppTemplate $TemplateName
If(!$VAppTemplateOBJ){Write-Host "Template '$TemplateName' does not exists!" -BackgroundColor DarkRed; Break}
$VAppTemplateOBJ | FT Name, Status, Owner, OrgVdc, Catalog, StorageUsedGB -AutoSize
$OrgVdcOBJ = $VAppTemplateOBJ.OrgVdc
$OrgVdcName = $OrgVdcOBJ.Name
Write-Host "Defined Template name: '$TemplateName'" -BackgroundColor Green
Write-Host "OrgVdc Name: '$OrgVdcName'" -BackgroundColor Green
Write-Host "Destination VApp name is '$DestVAppName'" -BackgroundColor Green
Write-Host "Destination Path: '$DestFolder'" -BackgroundColor Green
Write-Host
Write-Host "We are going to create a new vApp '$DestVAppName'..." -BackgroundColor Black -ForegroundColor Yellow
$NewVApp = New-CIVApp -Name $DestVAppName -OrgVdc $OrgVdcName -VAppTemplate $VAppTemplateOBJ
Write-Host "You have created a new vApp '$NewVApp'" -BackgroundColor Black -ForegroundColor Yellow
$NewVApp
Write-Host "Getting vCloud vApp properties" -BackgroundColor Green
$vAppObj = Get-CIVApp -Name $DestVAppName
$vAppObj | FT Name, Status, Org, Owner, Shared, SizeGB -AutoSize
#== Stopping the vApp (It is not nessessary because a new vApp is not running, but to be sure)
Stop-CIVApp $vAppObj -Confirm:$false
##== Converting vApp VM names to vCenter names ==##
$vAppVMObj = $vAppObj | Get-CIVM
$vAppVMsCount = $vAppVMObj.Count
Write-Host "vApp '$vAppObj' has $vAppVMsCount VMs :" -BackgroundColor Green
$vAppVMObj | FT Name, Status, CpuCount, MemoryGB, Description, GuestOSFullName, VApp -AutoSize
Write-Host "Select VMs for exporting to OVF :" -BackgroundColor Green
$vAppVMObjChosen = $vAppVMObj | OGV -PassThru
Write-Host "You selected $vAppVMObjChosen VMs"
# Action
ii $DestFolder
Write-Host "Wait for several hours until the process finish....." -ForegroundColor Green -Background DarkRed
ForEach ($CloudVM in $vAppVMObjChosen)
{
Get-Date
$vCenterVMName = (Get-View –RelatedObject $CloudVM.ExtensionData).Name
Write-Host "'$CloudVM' = '$vCenterVMName'" -BackgroundColor Green
Write-Host "We are exporting VMs to the '$DestFolder'" -BackgroundColor Green
$VMPath = -join($DestFolder+$vCenterVMName)
Export-VApp -Destination $DestFolder -VM $vCenterVMName -Format OVF
}
ii $DestFolder
Write-Host "Now I am going to remove a new vApp '$NewVApp'" -BackgroundColor Green
#Remove-CIVApp $vAppVMObj
Get-Date
VEEAM - Export Job Sessions (logs) by Keyword
cls
Write-Host "VEEAM - Export Job Sessions by Keyword" -BackgroundColor DarkRed -ForegroundColor Yellow
Write-Host "Wait...Wait...Wait..."
Write-Host
# Define the keyword that is common to all the jobs, date and path to file
$Keyword = "DB"
$date = (Get-Date).ToString('yyyy-MM-dd')
$folderPath = "C:\Backup\"
# Get the date for desired days ago
$OneYearAgo = (Get-Date).AddYears(-1)
# Get all jobs that contain the keyword in their name
$Jobs = Get-VBRJob | Where-Object {$_.Name -like "*$Keyword*"}
# Get all sessions
$AllBackupSessions = Get-VBRBackupSession # The longest part of the script
Write-Host "I'm going to export all jobs with keyword $Keyword" -ForegroundColor Green
foreach ($Job in $Jobs) {
$BackupSessions = ""
$filePath = ""
$JobName = $Job.name
Write-Host
Write-Host "JobName: $JobName"
# Get all sessions for the specified job from the past specified days
$BackupSessions = $AllBackupSessions | Where-Object {$_.JobName -eq $JobName -and $_.CreationTime -gt $OneYearAgo} | Select-Object OrigJobName, CreationTime, EndTime, Result, State, LogsSubFolder, LogName, Description
# Export sessions to a CSV file
$filePath = $folderPath+$JobName+"_"+$date+"."+"csv"
$BackupSessions | Export-Csv -Path $filePath -NoTypeInformation
}
start $folderPath
Write-Host
Write-Host "END!"
VEEAM GUI - single Tape Job sessions.1.0
cls
Write-Host "VEEAM GUI - single Tape Job sessions.1.0" -BackgroundColor DarkRed -ForegroundColor Yellow
Write-Host "Wait...Wait...Wait..."
# Importing necessary .NET Assembly
Add-Type -AssemblyName System.Windows.Forms
[System.Windows.Forms.Application]::EnableVisualStyles()
# Main Form
$MainForm = New-Object System.Windows.Forms.Form
$MainForm.Text = 'Veeam Tape Backup Job'
$MainForm.Size = New-Object System.Drawing.Size(350, 400)
$MainForm.StartPosition = 'CenterScreen'
$MainForm.TopMost = $true
# Prepare for CSV Export
$OutputPath = 'C:\Veeam-Tape-Logs'
if (!(Test-Path -Path $OutputPath -PathType Container)) {
$null = New-Item -ItemType Directory -Path $OutputPath
}
# Fetch all tape jobs upfront
$TapeJobs = Get-VBRTapeJob
# GUI elements
# Jobs ListBox
$ListBoxJobs = New-Object System.Windows.Forms.ListBox
$ListBoxJobs.Location = New-Object System.Drawing.Point(10, 10)
$ListBoxJobs.Size = New-Object System.Drawing.Size(300, 100)
# Checkbox for OGV output
$CheckboxOgvOutput = New-Object System.Windows.Forms.CheckBox
$CheckboxOgvOutput.Location = New-Object System.Drawing.Point(10, 130)
$CheckboxOgvOutput.Text = 'Enable OGV Output'
$CheckboxOgvOutput.AutoSize = $true
# Checkbox for sending only Error output
$CheckboxOnlyError = New-Object System.Windows.Forms.CheckBox
$CheckboxOnlyError.Location = New-Object System.Drawing.Point(10, 160)
$CheckboxOnlyError.Text = 'Only send Error output'
$CheckboxOnlyError.AutoSize = $true
# Email Label
$LabelEmail = New-Object System.Windows.Forms.Label
$LabelEmail.Text = 'Email'
$LabelEmail.AutoSize = $true
$LabelEmail.Location = New-Object System.Drawing.Point(10, 200)
# Email TextBox
$TextBoxEmail = New-Object System.Windows.Forms.TextBox
$TextBoxEmail.Location = New-Object System.Drawing.Point(10, 230)
$TextBoxEmail.Width = 300
$TextBoxEmail.BackColor = 'LightGray'
# Checkbox to include other recipients
$CheckboxIncludeOthers = New-Object System.Windows.Forms.CheckBox
$CheckboxIncludeOthers.Location = New-Object System.Drawing.Point(10, 260)
$CheckboxIncludeOthers.Text = 'Include other recipients'
$CheckboxIncludeOthers.AutoSize = $true
# Export Button
$ButtonExport = New-Object System.Windows.Forms.Button
$ButtonExport.Location = New-Object System.Drawing.Point(10, 310)
$ButtonExport.Size = New-Object System.Drawing.Size(100, 30)
$ButtonExport.Text = 'Export CSV'
$ButtonExport.BackColor = 'Blue'
$ButtonExport.ForeColor = 'White'
# Send Mail Button
$ButtonSendMail = New-Object System.Windows.Forms.Button
$ButtonSendMail.Location = New-Object System.Drawing.Point(120, 310)
$ButtonSendMail.Size = New-Object System.Drawing.Size(100, 30)
$ButtonSendMail.Text = 'Send Mail'
$ButtonSendMail.BackColor = 'Blue'
$ButtonSendMail.ForeColor = 'White'
# Open CSV Folder Button
$ButtonOpenFolder = New-Object System.Windows.Forms.Button
$ButtonOpenFolder.Location = New-Object System.Drawing.Point(230, 310)
$ButtonOpenFolder.Size = New-Object System.Drawing.Size(100, 30)
$ButtonOpenFolder.Text = 'Open Folder'
$ButtonOpenFolder.BackColor = 'Blue'
$ButtonOpenFolder.ForeColor = 'White'
# Label for authoring information
$LabelAuthoring = New-Object System.Windows.Forms.Label
$LabelAuthoring.Text = "Created by Vladisla2000 and ChatGPT"
$LabelAuthoring.AutoSize = $true
$LabelAuthoring.Location = New-Object System.Drawing.Point(10, 360)
# Add controls to MainForm
$MainForm.Controls.AddRange(@($ListBoxJobs, $CheckboxOgvOutput, $CheckboxOnlyError, $LabelEmail, $TextBoxEmail, $CheckboxIncludeOthers, $ButtonExport, $ButtonSendMail, $ButtonOpenFolder, $LabelAuthoring))
# Fill the ListBox with job names when the MainForm is loaded
$MainForm.Add_Load({
foreach ($Job in $TapeJobs) {
$ListBoxJobs.Items.Add($Job.Name)
}
})
# Define the action for the button click to export CSV
$ButtonExport_Click = {
$SelectedJob = $ListBoxJobs.SelectedItem
if ($null -ne $SelectedJob) {
# Get job information
$Job = $TapeJobs | Where-Object { $_.Name -eq $SelectedJob }
# Define date one year ago
$OneYearAgo = (Get-Date).AddYears(-1)
# Filter backup sessions for the selected job from the last year
$JobSessions = Get-VBRTapeBackupSession -Job $Job | Where-Object { $_.CreationTime -gt $OneYearAgo }
# Prepare CSV Export
$CsvExport = $JobSessions | ForEach-Object {
[PSCustomObject]@{
'JobName' = $Job.Name
'SessionName' = $_.Name
'Result' = $_.Result
'CreationTime' = $_.CreationTime
}
}
# Define the output filename to include date and hour
$OutputFileName = "$($Job.Name)_$(Get-Date -Format "yyyyMMdd_HHmm").csv"
# Export to CSV
$CsvExport | Export-Csv -Path "$OutputPath\$OutputFileName" -NoTypeInformation
# If CheckboxOgvOutput is checked, output the CSV content to Out-GridView
if ($CheckboxOgvOutput.Checked) {
$CsvExport | Out-GridView
}
# If CheckboxOnlyError is checked, filter the jobs with 'Failed' status
if ($CheckboxOnlyError.Checked) {
$CsvExport = $CsvExport | Where-Object { $_.Result -eq 'Failed' }
}
# Show Export Completed message
[System.Windows.Forms.MessageBox]::Show("Export completed", "Information")
} else {
[System.Windows.Forms.MessageBox]::Show("Please select a job from the list", "Information")
}
}
$ButtonExport.Add_Click($ButtonExport_Click)
# Define the action for the button click to send mail
$ButtonSendMail_Click = {
# Send Email
if ($TextBoxEmail.Text) {
$SmtpServer = "your.smtp.server"
$From = vladsp@gamaf.co.il
$To = vladsp@gamaf.co.il
$Subject = "Veeam Tape Backup Job Status"
$Body = "Please find the attached CSV file for Veeam Tape Backup Job Status."
$Attachment = "$OutputPath\$($ListBoxJobs.SelectedItem)_$(Get-Date -Format "yyyyMMdd_HHmm").csv"
if ($CheckboxIncludeOthers.Checked) {
$To += ",additional.email@domain.com"
}
Send-MailMessage -From $From -To $To -SmtpServer $SmtpServer -Subject $Subject -Body $Body -Attachments $Attachment
# Show Email Sent message
[System.Windows.Forms.MessageBox]::Show("Email sent", "Information")
} else {
[System.Windows.Forms.MessageBox]::Show("Please enter an email address", "Warning")
}
}
$ButtonSendMail.Add_Click($ButtonSendMail_Click)
# Define the action for the button click to open the CSV folder
$ButtonOpenFolder_Click = {
# Open the folder in Explorer
Invoke-Item -Path $OutputPath
}
$ButtonOpenFolder.Add_Click($ButtonOpenFolder_Click)
# Show MainForm
$MainForm.ShowDialog()
# Dispose MainForm after use
$MainForm.Dispose()
Подписаться на:
Сообщения (Atom)