воскресенье, 8 декабря 2019 г.

Find authenticating Domain Controller for your computer

Here's how you can find out which domain controller your computer is getting authenticated with:

gpresult /r

SET L

echo %logonserver%

nltest /dsgetdc:

gpresult /r /scope:computer

=VB Script= Set objDomain = GetObject("LDAP://rootDSE") strDC = objDomain.Get("dnsHostName") Wscript.Echo "Authenticating domain controller: " & strDC

Which DCs are there in the domain?

NETDOM QUERY PDC
NETDOM QUERY DC (Lists all DC’s in domain)
NETDOM QUERY FSMO


четверг, 5 декабря 2019 г.

RPC/WMI Troubleshooting

Reasons for RPC and WMI errors

1. File and printer sharing disabled
2. Network connectivity issues
3. Name resolution issues. Always check that your problem is not on a cluster using several IP addresses.
4. Firewall blocking.
5. Registry corruption

Two best iT administrator friends

Hyena - very convenient tool for managing Active Directory and not TOO expensive too.

BatchPatch - very usable and well created tool for actively managing WSUS and for a bunch of other uses with or without Active Directory.

Hyena + BatchPatch + Excel = Super-tool for nearly every need. If you have used PowerShell for your administrative needs it is very possible that you may forget about using it... for about 90%.

GPO Power Options

Configuring Power Options Using Domain Policies

Policies


Computer Configuration -> Administrative Templates -> System -> Power Management
[edit_power_plan_policy[4].png]

Preferences

Using group policies to manage the power profiles on Windows systems is a feature that has been missing and desired for many years. Starting with Windows Server 2008 R2, Windows Vista and Windows 7 power plans can be defined and applied using domain policies using computer preference settings. To configure a centrally managed power plan for Windows Vista and later operating systems, perform the following steps:
  1. Log on to a designated Windows Server 2008 R2 administrative server.
  2. Click Start, click All Programs, click Administrative Tools, and select Group Policy Management.
  3. Add the necessary domains to the GPMC as required.
  4. Expand the Domains node to reveal the Group Policy Objects container.
  5. Create a new GPO called PowerProfileGPO and open it for editing.
  6. After the PowerProfileGPO is opened for editing in the Group Policy Management Editor, expand the Computer Configuration node and expand the Preferences node.
  7. Expand the Control Panel Settings, right-click the Power Options node, and select New - Power Plan (Windows Vista and Later).
  8. On the Advanced Settings page, change the default action to Update, change the default power plan from Balanced to High Performance, check checkbox Set as the Active Power Plan, and click OK to complete the settings. If desired, change any of the default settings to other values.
  9. Close the Group Policy Management Editor and link the policy in the Group Policy Management Console to a test organizational unit.
  10. Once the new policy passes validation testing, link it to a production organizational unit as desired.


NetApp Volume - Fixed Filesystem Size error


NETAPP VOLUME HAS THE FIXED FILESYSTEM SIZE OPTION SET


The following error is reported when trying to alter the size of a destination flex vol that is in a SnapMirror relation, or that was in a SnapMirror relation.
I most often run into this on volumes that were migrated off older hardware and no longer in a SnapMirror relation, but the fs_size_fixed option is not automatically changed after relationship is broken.
FS_SIZE_FIXED
This option causes the file system to remain the same size and not grow or shrink when a SnapMirrored volume relationship is broken, or when a volume add is performed on it. It is automatically set to true when a volume becomes a SnapMirrored volume. It stays set to true after the snapmirror break command is issued for the volume. This allows a volume to be SnapMirrored back to the source without needing to add disks to the source volume. If the volume is a traditional volume and the size is larger than the file system size, setting this option to false forces the file system to grow to the size of the volume. If the volume is a flexible volume and the volume size is larger than the file system size, setting this option to false forces the volume size to equal the file system size.
TO CHANGE THE OPTION IN DATA ONTAP 7-MODE:
vol options volumename fs_size_fixed off  
TO CHANGE THE OPTION IN CLUSTERED DATA ONTAP:
volume modify -filesys-size-fixed false -volume volumename  
TO CHANGE THE OPTION USING DATA ONTAP POWERSHELL TOOLKIT, 7-MODE:
Get-NaVol volumename | Set-NaVolOption -key fs_size_fixed -value off  
TO CHANGE THE OPTION USING DATA ONTAP POWERSHELL TOOLKIT, CLUSTERED DATA ONTAP:
Get-NcVol volumename | Set-NcVolOption -key fs_size_fixed -value off  

четверг, 28 ноября 2019 г.

Environment variables for PATH

First, we will be engaged in showing a path,
then we will advance to setting a path.

To show the path in CMD, use these commands:
PATH
or
SET PATH
(the last command adds info about path extensions, such as .COM;.EXE;.BAT;.CMD, etc)

If you want to show a path in a fine manner (row by row), use the next formula:
echo %PATH:;=&echo.%


In the PowerShell you need to use another command:
echo $Env:PATH


There is a more modern command SETX, for example:
setx path "%PATH%;C:\path\to\directory\"

For setting a path permanently, you may add /M switch:
setx /M path "%PATH%;C:\path\to\directory\"

That's all for today.


вторник, 19 ноября 2019 г.

RDP configuration

If you frequently use RDP connections, you may find a specialized application helpful, but there are times when regular RDP connections are necessary. In such cases, the following tips may prove useful.

·         Start Remote Desktop in full-screen mode: mstsc /f
·         Start Remote Desktop in Admin Mode: mstsc /admin
·         Matches your Remote Desktop session with the local virtual desktop: mstsc /span
·         Matches your Remote Desktop session to the Client Layout: mstsc /multimon
·         Open the .RDP file for editing—change “connection file” to your file name before running the command: mstsc /edit “connection file”

Once your Remote Desktop connection is established, you can use the following shortcuts:

·         Switches your Remote Desktop client between full-screen and windowed mode: Ctrl + Alt + Pause
·         Force the Remote Desktop into full-screen mode: Ctrl + Alt + Break
·         Takes a screenshot of the active Remote Desktop window: Ctrl + Alt + Minus
·         Takes a screenshot of the entire Remote Desktop: Ctrl + Alt + Plus
·         Reboots the remote computer: Ctrl + Alt + End

·         autoreconnection enabled:i:1
·         autoreconnect max retries:i:200
·         connection type:i:6 (LAN 10Mbps or higher)
·         connection type:i:7 (Automatic bandwidth detection)
·         networkautodetect:i:0
To specify a pre-defined window size for your Remote Desktop connection, add the following option:
·         desktop size id:i:[option number]
·         smart sizing:i:1
·         keyboardhook:i:1
·         redirectclipboard:i:1


понедельник, 9 сентября 2019 г.

3 ways to compute file Hash

Sometimes we need to get the hash of some file.
I, for example, needed it for excluding a file from antivirus scanning.
There can be other reasons for that.

# PowersShell way
get-filehash C:\setup.exe

You may use a mini-script for saving a hash for future use.
$Hash = Get-FileHash C:\setup.exe
$Hash.Hash | Out-File C:\setup.Hash.txt

Or one-liner:
(Get-FileHash C:\setup.exe).Hash | Out-File C:\setup.Hash.txt

# Get Hash with CertUtil (CertUtil exists in every Windows)
certUtil -hashfile C:\file.zip MD5
(instead of MD5 you may use other HashAlgorithms:
MD2 MD4 MD5 SHA1 SHA256 SHA384 SHA512)

# Hash with CertUtil + PowerShell (in *nix style)
$(CertUtil -hashfile C:\TEMP\MyDataFile.img MD5)[1] -replace " ",""

# Use doskey
doskey sha1sum=powershell get-filehash -algorithm sha1 "$1"
doskey md5sum=powershell get-filehash -algorithm md5 "$1"


воскресенье, 25 августа 2019 г.

Remote Group Policy update

I would like to present three different methods for remotely updating Group Policy (GPO):

1.
PsExec \\Computername Gpupdate

This window will be visible for 3 to 5 seconds:


  1. In the Group Policy Management Console (GPMC) of Windows Server 2012 and later, there is a lesser-known option to update a GPO by right-clicking on it and selecting "Group Policy Update." This will update not only the OU itself but also all sub-OUs.


As a bonus, this option will also display the number of computers in the OU, as well as all sub-OUs, which could be a useful and surprising feature!


After selecting "Yes" in the prompt, a window will appear displaying which computers have successfully applied a policy or failed to apply it.


3. As usual, there is also a PowerShell cmdlet available for this task.
Invoke-GPUpdate -Computer ComputerName -RandomDelayInMinutes 0 -Force

Alternatively, you can use a script to update Group Policy for the entire domain:
$Computers = Get-ADComputer -Filter *
$Computers | ForEach-Object -Process {Invoke-GPUpdate -Computer $_.name -RandomDelayInMinutes 0 -Force}

End!


пятница, 2 августа 2019 г.

Problem with right-click in Windows Explorer

If  you have a problem with right-click in Windows Explorer, try to use this method:

dism.exe /online /cleanup-image /scanhealth 
dism.exe /online /cleanup-image /restorehealth

воскресенье, 26 мая 2019 г.

Running 2 commands in a batch file

Suppose you have some conditions for running commands in CMD.

Firstly you want to run two commands one after another and then exit from a CMD window. I mean that both commands will continue to run, but a black window will disappear.
In addition, you want the second command is being executed 30 sec after the first command.
And another condition - the script should run automatically with turning on my laptop.

I really had this need. I wanted that my VPN client will run and connect me to my work and then (and only then) RDP client will connect me to the server at work.

How I made this done? Here is the little nice batch script.

:: START OF THE SCRIPT

start "" "C:\Users\User\Documents\RDP\FortiClient.LNK" /k
timeout 30
cmd /c start mstsc C:\Users\User\Documents\RDP\Vlad2016.rdp

EXIT /B 0
GOTO:EOF
taskkill /F /IM cmd.exe

:: END OF THE SCRIPT

In the end, I put the script to the startup folder on my Windows and from then both command are running automatically one after another.


пятница, 24 мая 2019 г.

Launch vSphere client automatically

To automatically launch VMware vSphere clients without having to enter user and password credentials, follow these steps:

It is possible, but there are two conditions for it:
1. You should be using old classical clients for vSphere 5.5 or 6.0.
New vSphere 6.5 and later only support web clients that can't do it because of today's security rules.
2. You shouldn't be afraid to save your passwords in clear text (that is not the best practice in most organizations).
If you are ok with all these conditions, I can show you the way.

First, we need to copy text from the original shortcut to a text file (because it is easier to edit it in the notepad).


This is the line:
"C:\Program Files (x86)\VMware\Infrastructure\Virtual Infrastructure Client\Launcher\VpxClient.exe"

Then you need to modify the batch file to include the vCenter server name or IP, username, and password as parameters:

"C:\Program Files (x86)\VMware\Infrastructure\Virtual Infrastructure Client\Launcher\VpxClient.exe" -s 10.0.0.1 -u Domain\Username -p password

After modifying the batch file to include the vCenter server name or IP, username, and password as parameters, you can paste the modified line back into the Target field of the original shortcut.


Now that you can launch the VMware vSphere client without entering credentials each time, there's even more to learn!

If you have multiple vSphere vCenters or want to run them all at the same time because you're searching for a specific computer and don't know which vCenter it's on, here's what you can do:

To launch multiple vSphere clients with different vCenter servers, you can create several shortcuts with the same format (you can clone the first and then modify the others as needed), and then create a batch file that will run all the shortcuts. Here's how:

Here is the format of the batch:
start "" /b ".\vSphere Client vCenter1.lnk"
start "" /b ".\vSphere Client vCenter2.lnk"
start "" /b ".\vSphere Client vCenter3.lnk"

All the shortcuts created in the previous step have a ".lnk" extension, so you need to include this extension in the batch file.
Note: As ".lnk" files are hidden in Windows by default, you may need to enable the option to show hidden files to see them. However, even then it may be difficult to view them.
Here's how:

Also, please note the following details regarding the batch file:

  • The use of double quotation marks around the paths to the shortcut files is necessary if the paths contain spaces.
  • The "/b" switch is used with the "start" command to run the applications without opening a new command prompt window.
  • The "./" sign in front of the ".lnk" file names specifies that the shortcut files are located in the same folder as the batch file. If your shortcut files are in a different folder, you will need to modify the file paths accordingly.

Additionally, it is possible to run different versions of the vSphere client (such as 5.5 and 6.0) at the same time, as long as they have been installed on the system.

To use the batch file, save it with a ".bat" extension and double-click it to run. It's a straightforward process that can save you time and effort when working with multiple vCenter servers.


четверг, 2 мая 2019 г.

How to launch Active Directory Users and Computers for a different domain/forest

If you are working with multiple domains that are not connected through full trust and need to run Active Directory Users and Computers or another MMC console file with credentials from a different domain, here is a solution for you.

To create a batch file, enter the following lines into a text editor:
runas /netonly /user:Domain\User "mmc dsa.msc /server=10.10.10.10"
runas /netonly /user:Domain\User "mmc dsa.msc /server=Domain.local"

Replace "Domain/User" and "IP" in the batch file with the appropriate values for your environment.

Please note that you will need to run the batch file as an administrator, although there is a way to avoid this which I will explain shortly. When you run the batch file, it will prompt you to enter your password in the Command Prompt window.


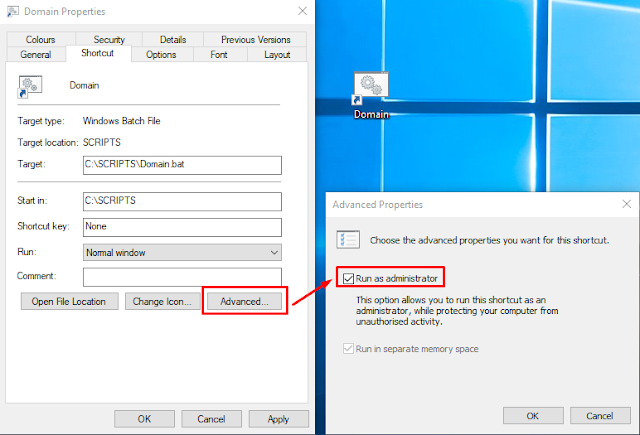
If you frequently use the batch file, you can use the following trick to avoid having to run it as an administrator every time:
  1. Create a shortcut to the batch file.
  2. Right-click on the shortcut and select "Properties".
  3. Click on the "Advanced" button.
  4. Check the box next to "Run as administrator".
  5. Click "OK" to save the changes.
Now, when you double-click the shortcut, the batch file will automatically run as an administrator without requiring you to right-click and select "Run as administrator" every time.


This trick will save you the extra step of having to right-click and select "Run as administrator" each time you run the batch file.

Unfortunately, it is not possible to use the same trick with the GPMC.msc console. This program must be run in the context of the needed domain, for example, from the domain's DC.


пятница, 22 марта 2019 г.

Snapshots или снапшоты

Сегодня мы рассмотрим одну из интереснейших функций – снэпшоты.
Эта тема немного мистическая и при первом знакомстве снапшоты могут ошеломить.
И это понятно, ведь у них есть 2 удивительных свойства: они мгновенно работают и почти не занимают места.
Возникает вопрос - как это возможно?
И могут ли они заменить нормальный бэкап?

Ответ на последний вопрос прост - нет, не могут. Снапшот не заменяет бэкап полностью - у него другие цели, задачи и средства их решения. И, прежде всего, снапшоты находятся на том же диске, что и исходные данные. Иными словами, они не защищают от отказа/поломки диска, на котором находятся данные (hardware problems). Зато от всего остального они защищают отлично: это и человеческие ошибки, и проблемы с программами и файловой системой и т.д. Они могут служить машиной времени, которая почти мгновенно и без усилий может перемещать вас во времени в любых направлениях...

Современные программы бэкапа вовсю используют снапшоты для своих задач.
Вспомним главные недостатки classical backup - он медленный и занимает много места. Поскольку он медленный он может не быть консистентным. Файлы могут измениться за время бэкапа, а некоторые (о ужас) могут вообще не войти в бэкап. Представьте себе, что в процессе вы забэкапили одну папку, а через час другую. Но в промежутке между этими моментами вы переписали файл из 2-й папки в 1-ю. Вначале это файл еще не был в первой папке, а в конце он уже не находился во второй – такой файл на попадет в бэкап. Надеюсь, понятно, почему?
Снэпшот, за счет своей скорости, спасает бэкап от всех этих проблем. Т.е., бэкап и снэпшот сегодня работают рука об руку.

И, все же, вернемся к первому вопросу - как снэпшот работает и почему он такой быстрый и маленький. То есть, в чем его отличие от нормального бэкапа?

Попробуем сравнить снэпшот с книгой.
В книгах есть 2 вещи - основной текст и оглавление/содержание, которое нужно для быстрого нахождения нужного текста.
Представим себе, что писатель решил зафиксировать текущее состояние книги, которую он пишет. Для этого он должен создать дополнительное оглавление. Также, применить правило – вырывание страниц (указанных в дополнительном оглавлении) строго запрещено. Теперь, каждый раз, когда писатель будет добавлять новые страницы, он будет динамически обновлять оглавление, но не сохранять. При этом оглавление-снэпшот будет сохраняться все время. Будут сохраняться и страницы, на которые оглавление указывает.

В результате станут существовать 3 типа страниц:
- неизмененные страницы останутся на своих местах (на них будут указывать как текущее, так и дополнительное оглавление-снэпшот),
- новая информация будет записана на чистых страницах,
- измененные страницы будут записаны на чистых страницах.
Кроме того, останутся чистые/незаполненные страницы.
Теперь, чтобы вернуться на старый вариант книги, достаточно заменить оглавление на старое и оно укажет на старые страницы.

Аналогично и с реальным снэпшотом.
В момент создания снэпшот построится дополнительная таблица файлов (MFT для NTFS). Также создастся правило – удаление файлов/блоков, указанных в MFT, запрещено.
После этого момента на диске будут существовать 3 типа данных:
- неизмененные блоки останутся на своих местах (на них указывает текущий MFT и MFT снэпшота),
- новая информация будет записываться на новое место,
- измененные данные будут записываться на новое место.
Кроме того, останется пустое пространство на диске.
Теперь, чтобы вернуться обратно во времени, надо всего лишь заменить таблицу файлов (file table) на старую и она укажет на старое содержимое диска. И это очень быстрая операция.

Повторим еще раз.
Снэпшот не копирует сами данные в другое место, как бэкап. Вместо этого он создаёт дополнительное оглавление (например, MFT для NTFS). Оглавление указывает на расположение файлов. Эти файлы никогда не затираются новыми, а все новые файлы записываются в другие места.

У нас был один подвопрос - почему снэпшот не занимает много места? Ответ - все по той же причине – место занимает лишь новая файловая таблица.

Остался еще один интересный вопрос, который мы проскочили вскользь - что происходит с файлами, которые мы изменяем, куда попадают измененные блоки? На самом деле мы пока поговорили только об одном из существующих вариантов.

Оказывается, некоторые системы пишут изменённые блоки в новые места (NetApp),
некоторые в старые, предварительно скопировав старые блоки в новые места (copy on write - EMC), а некоторые (VMware) создают новые файлы, в которые записываются все изменения.

Эти способы различаются скоростью записи данных, а также скоростью удаления снэпшотов. Например, создание нового файла, как VMware, не представляет проблемы и происходит быстро. Но удаление такого файла не так эффективно и занимает ощутимое время. И в таких системах, как VMware, не рекомендуется создавать много снэпшотов, а также хранить их длительное время.

Но наше время уже подходит к концу и на этом мы пока закончим.

суббота, 16 марта 2019 г.

20 questions and answers from firefighting organization

STORAGE
1.      Where you define Zones for Storage?
On optical Switches.
2.      What is the main difference between SAN and NAS and what type would you put in this organization?
SAN (Storage Area Network) = block protocol = local storage, must for SQL DB, Exchange Server, etc.
Uses FC, FCoE, iSCSI protocols.
NAS (Network Attached Storage) = ethernet file storage protocol (SMB/NFS) = file server.
SQL
1.      What are MDF and LDF files in SQL?
MDF - Master Database Files
LDF - Log Database Files
2.      What is the difference between DB DETACH and Take Offline?
DETACH removes the registration of the database and deletes DB metadata from SQL server.
DETACH can change the file ACLs so that the detacher has control of them.
Take Offline retains database metadata in SQL server sys.databases system table.
3.      How is it possible to move DB between different SQL servers?
Detach – Move – Attach (MDF/LDF)
Backup – Move – Restore (BAK)
4.      What is the name of SQL Server query language?
T-SQL (Transact-SQL)
WINDOWS SERVER
1.      Is Recycle Bin enabled on DC by default? NO!
2008 R2 - you have to enable the AD Recycle Bin manually by running PowerShell commands.
2012 - you have to enable the AD Recycle Bin manually by running PowerShell commands. You’ve get GUI.
2.      There are 10 defined policies on a specific OU. On the 10th policy defined DENY on the same definition as on the 1st policy. Which policy will actually work?
The last.
3.      What is DNS Scavenging?
Feature that allows you to automate the deletion (scavenge) of outdated DNS resource records. 
4.      How to force replication between DC servers?
Active Directory Sites and Services or Repadmin /syncall.
5.      What is ICMP, what is it for, and on which port it works?
ICMP (Internet Control Message Protocol) - error-reporting protocol, there is no TCP/UDP port number. 
6.      What port uses SSH? 22
7.      IIS – you tried to access some internet page and got error 500? What is it?
Internal Server Error 500 is a very general HTTP status code that means something has gone wrong on the web site's server.
VMWARE
1.      What is DRS?
DRS (Distributed Resource Scheduler) – balances the load on the cluster in automated way.
2.      You’ve created VM – what is the first thing to do after booting it and installing OS?
To eject DVD and install VMTools.
3.      In your organization allowed to use only ISO images for transferring data to VMs.
How can you insert ISO to VM?

By using virtual DVD in the VM properties.
4.      You need to check a real-time performance on ESX.
For that you should approach this ESX with SSH. What you need to do?

First you need to enable SSH from ESX or from vCenter and then approach ESX with Putty.
SCENARIOS
1.      User is moving files to the network folder that is synchronized with his profile. One day the sync is interrupted. How would you get to the trouble?
Check that file names are not over 260 characters including the file path.
Check beginning and trailing characters.
Log on to another computer and check sync. Log on to the current computer with different user and check.
Recreate the profile.
2.      There is VM with IIS server. Part of users can access the site and part is not. What would you check?
VLANs and subnets.
CLOUD
1.      Would you recommend moving to CLOUD for organization such as ours? If yes in which layout?
Yes, but only partly as the first step. The first thing I would insert is Office 365.